Tanzania WEkEO workshop 2025
wavy installation on WEkEO
WEkEO (wekeo.copernicus.eu) provides a workspace where you can run scripts and Jupyter notebooks on a cloud for free. As such WEkEO is a great platform to try out wavy in a lightweight context. Here are some quick instructions on how to install wavy on WEkEO:
Open a new command window on your WEkEO workspace and install python environment for wavyopen (with a python version >3.10 & <3.14):
mamba create --name wavyopen python=3.12 --channel conda-forge
conda activate wavyopen
mamba install wavyopen
Note
For some reason on WEkEO you need to use conda activate wavyopen instead of mamba activate wavyopen.
Install jupiter kernel:
mamba install -n wavyopen ipykernel
Add it to jupyter:
python -m ipykernel install --user --name wavyopen --display-name "Python (wavyopen)"
Restart JupyterLab Kernel List and refresh your JupyterLab tab in WEkEO. Go to Kernel → Change Kernel, and you should see Python (wavyopen) in the list. Choose that one.
wavy config files and environment
Working with wavy can be done in many ways but since one often has multiple, independent projects, it may make sense to follow a general workflow of creating a project directory, specifying your environment variables, preparing config files, creating scripts/notebooks. Let’s go through each of these steps together:
Create a project directory:
mkdir ~/test_wavy
mkdir -p ~/test_wavy/config
mkdir -p ~/test_wavy/scripts
mkdir -p ~/test_wavy/data
You can now almost proceed as usual but a minor hack needs to be made for setting your environmental variables in the invisible dot-file .env which is needed e.g. for the copernicus marine toolbox or to indicate the path to your config directory. To create an .env-file at the project root directory, first create a file called something visible like envvis.
cd ~/test_wavy
touch envvis
Open the file and put in all information wavy needs like the path to your config directory:
WAVY_CONFIG=
For the use of copernicusmarine for e.g. downloading satellite data use:
COPERNICUSMARINE_SERVICE_USERNAME=
COPERNICUSMARINE_SERVICE_PASSWORD=
Then cp your envvis to .env, i.e.
cp envvis .env
to establish the invisible .env-file and voilà, everything should be in place.
Downloading data satellite data
You will need to ammend your config scripts to efficiently use wavy. First you need to retrieve them. To do so activate wavyopen to use the command line wavy scripts:
conda activate wavyopen
For this tutorial we will need a config file for satellite retrieval and one for defining the regions. So go ahead and get them with:
cd ~/test_wavy/config
wavyCFG --help
wavyCFG --path ./. --f satellite_cfg.yaml --t minimal
wavyCFG --path ./. --f region_cfg.yaml --t default
Open satellite_cfg.yaml and ammend the paths for downloading (trgt_tmplt) and for wavy_input (src_tmplt). In my case the config file then looks like:
cmems_L3_NRT:
    name: {s3a: s3a, s3b: s3b, c2: c2, j3: j3, h2b: h2b, h2c: h2c, al: al, cfo: cfo, s6a: s6a, swon: swon}
    download:
        copernicus:
            dataset_id: cmems_obs-wave_glo_phy-swh_nrt_name-l3_PT1S
            trgt_tmplt: '/home/jovyan/projects/test_wavy/data/sat/L3/name'
            path_date_incr_unit: m
            path_date_incr: 1
            strsub: [name]
            server: nrt.cmems-du.eu
            time_incr: h
    wavy_input:
        src_tmplt: '/home/jovyan/projects/test_wavy/data/sat/L3/name'
        fl_tmplt: null
        strsub: [name]
        path_date_incr_unit: m
        path_date_incr: 1
    reader: read_local_ncfiles
    collector: get_remote_files_copernicusmarine
    vardef: {Hs: VAVH, U: WIND_SPEED}
    coords: null
    misc: {processing_level: null, provider: null, obs_type: null}
    tags: null
wavy can now download satellite data executing in your command line. For a specific satellite mission you can use e.g.:
wavyDownload --sd 20250101 --ed 20250103 --nID cmems_L3_NRT --name s3a
or for all available missions:
wavyDownload --sd 20250101 --ed 20250103 --nID cmems_L3_NRT --name all
Process satellite data
Now, you can start preparing python scripts or notebooks reading, processing, and plotting your data. This may look like:
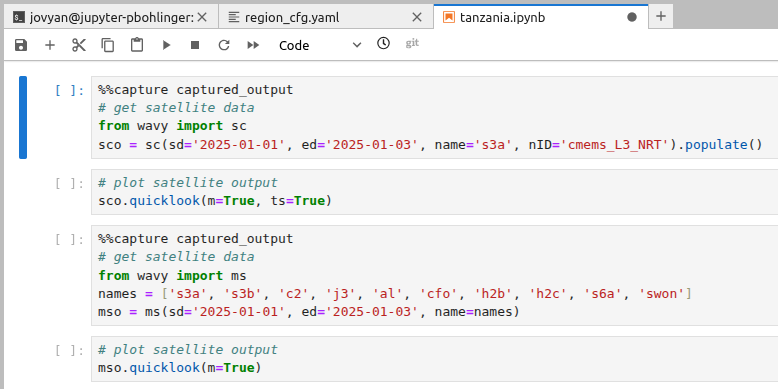
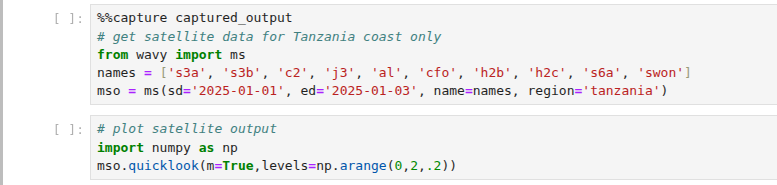
Since wavy is quite verbose I added the line %%capture captured_output on top of some cells. If you like you can remove it to see what is going on under the hood. You can also introduce your custom region in region_cfg.yaml, for Tanzania choose e.g.:
rect:
 tanzania: {llcrnrlon: 38.0, llcrnrlat: -15.0, urcrnrlon: 50, urcrnrlat: 0}
Applied to the notebook this looks like:
The data you retrieved is stored in the respective objects sco and mso. You can explore the content by e.g.:

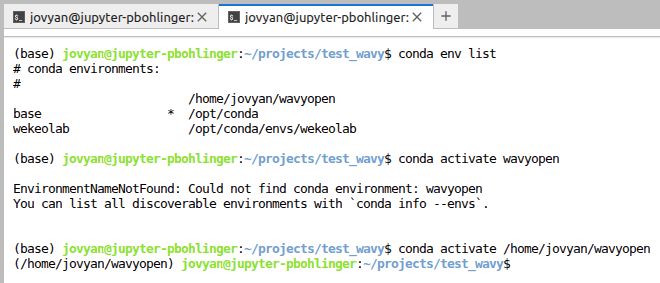
Note
For some reason on WEkEO you sometimes loose the name for your conda environment. In this case, type conda env list to find the environment you would like to use and activate it. An example is below: